The Face Capture methods available in the mobile SDKs
A Liveness check refers to the act of determining if an image captured by a camera is of a real person rather than their image printed on paper, shown on a screen, or a capture of someone wearing a 3D Mask.
Before a Liveness check, one or more good images of a face must be captured.
There are two methods for capturing faces: Active Face Capture and Passive Face Capture.
Active Face Capture asks the user to move their head in 3 random directions while Passive Face Capture works with just a single good image. The aim of Active Face Capture is to avoid injection attacks where a malicious actor injects a single image such that the mobile app believes that the image comes from a legitimate camera. Since it is harder to capture a video of a user in which their head position is in all requested directions, Active Face Capture mitigates against injection attacks.
Even when Active Face Capture is selected as a face capture method, when liveness is enabled for SensePrint verification, it is always followed by a Liveness check to mitigate against screen, print, and 3D mask attacks.
For customers who do not need protection against advanced threat vectors such as 3D masks, Active Face Capture in itself can act as a Liveness check. However, we recommend that customers with advanced protection requirements should always use Liveness checks on top of Active Face Capture.
Active Face Capture can only be performed using a front camera. To verify a face against a SensePrint using Active Face Capture, follow these steps:
Create an Active Face Capture Session: This must be done before the camera preview begins.
Camera Preview: The camera preview runs on the screen, capturing frames. Afterward, the frames undergo preprocessing to prepare them for the SDK. First, the images are rotated according to the SDK's requirements, then compressed into JPEG/PNG format and converted into byte arrays. These byte arrays are then passed to the SDK to determine the face position.
Active Face Capture Result : The SDK returns an Active Face Capture Result for each frame, which developers can use to update the UI. Basically, the UI needs to handle four components based on the result: expected user's facial direction, their current head position, animation status, and direction strength indicators. Developers can update the expected direction name in the text, show or hide animations, and display a direction strength indicator to guide the user to look in specific directions (e.g., bottom, left, up). These values should be continuously updated until the face scan is completed.
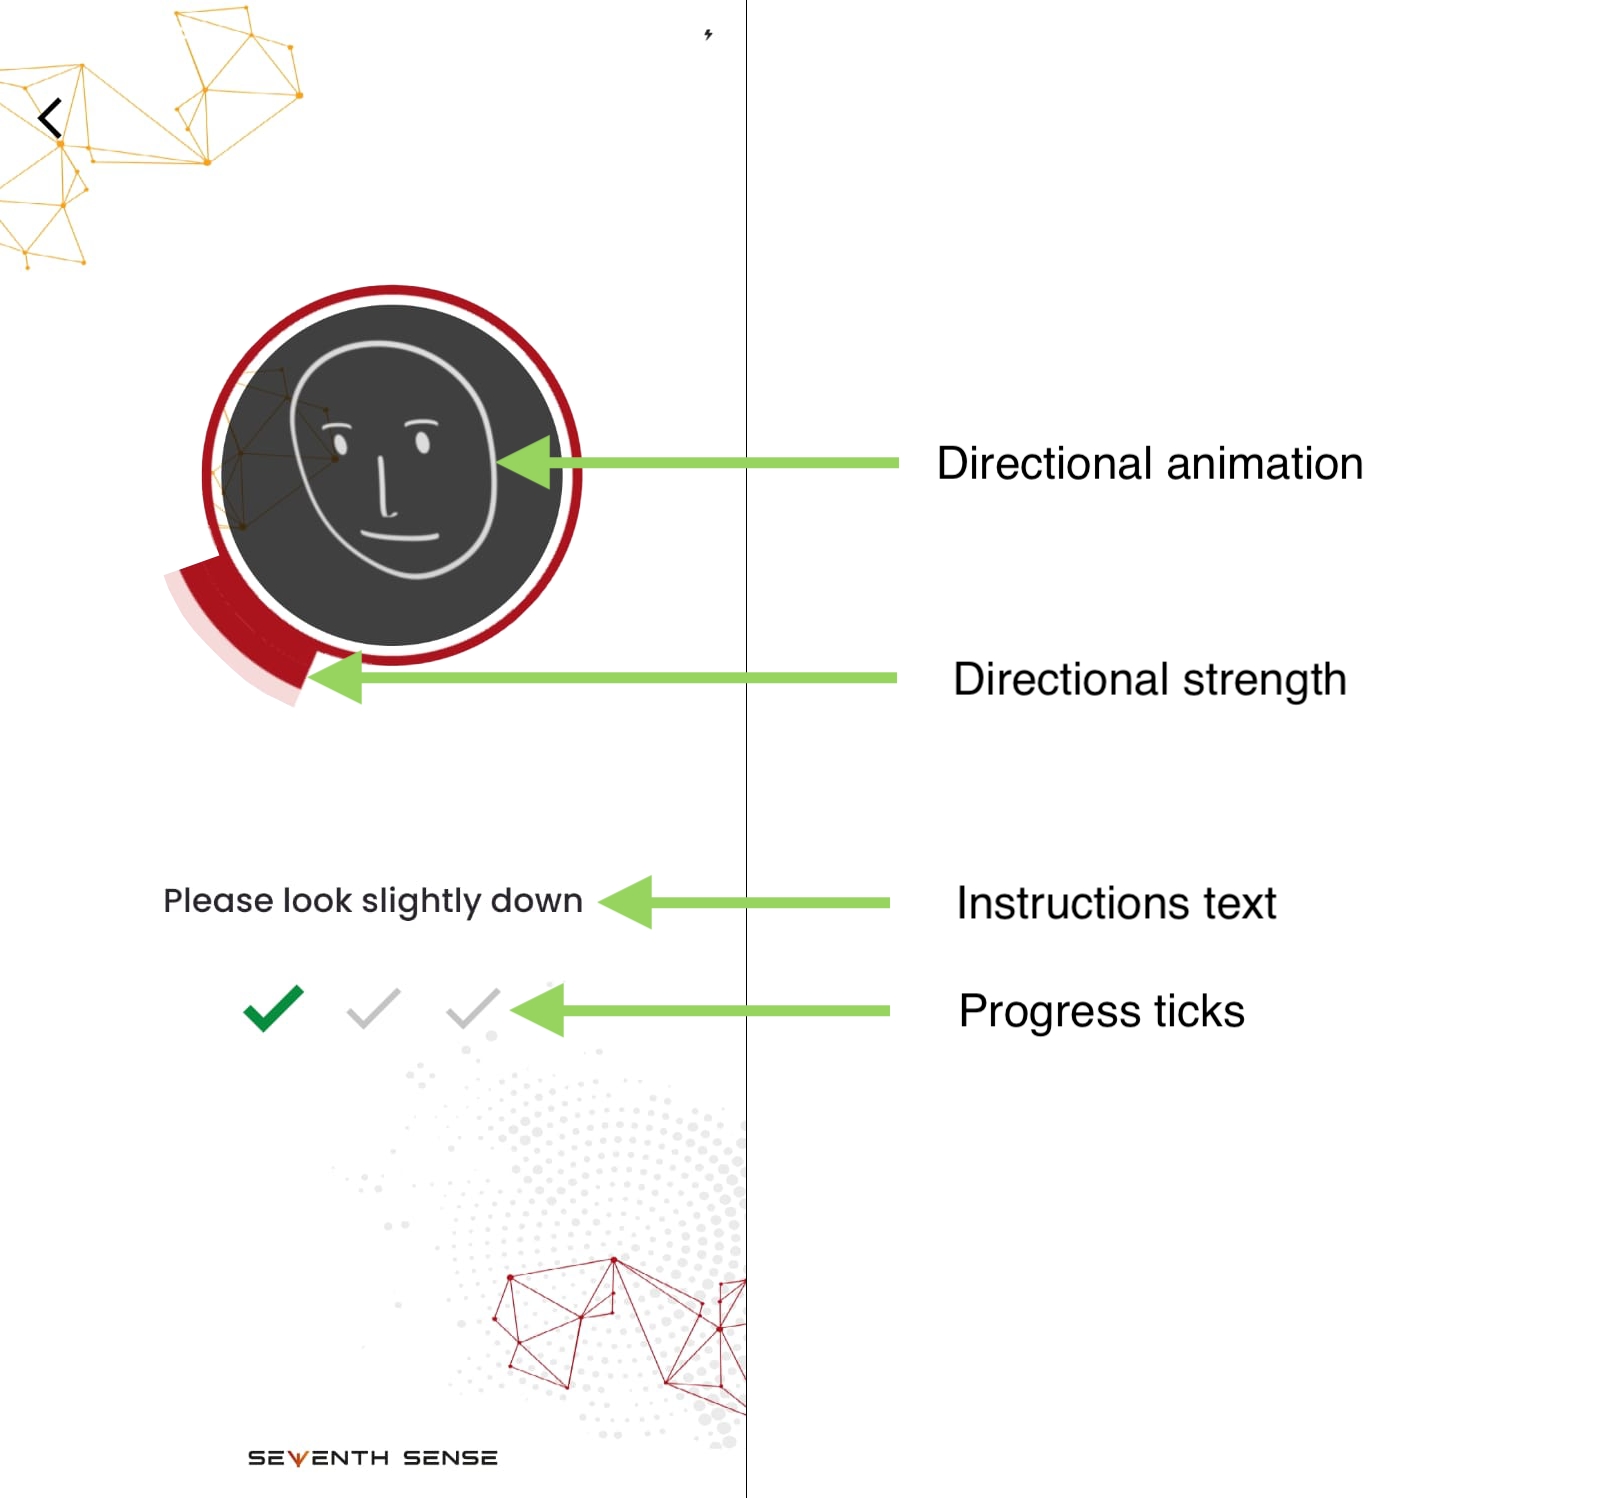
Three different UI options assist the user in completing the face scan. The UI includes:
Directional Animation: Brief animations guide the user to look in the required directions.
Direction Strength: An arc indicates the direction the user should look along with indicating the amount the user is looking in that direction, marking a tick when completed.
Instructions Text : Some text shows the expected facial direction by SDK
Progress Ticks: As each direction is completed, developers needs to update the UI to reflect the completed ticks. The following image shows some of these concepts as implemented in the reference UI app:
Errors: The SDK throws an error when issues occur, such as when the face is not live, multiple faces are detected, or the license has expired. Developers need to handle all these errors appropriately.
Passive Face Capture can be performed using both the front and back camera. To verify a face against a SensePrint using Passive Face Capture, follow these steps:
Create a Passive Face Capture Session: Similar to the Active Face Capture sessions, this must be done before the camera preview begins.
Camera Preview: Similar to Active Face Capture, refer to the steps outlined in Active Face Capture Step 2 for guidance.
Passive Face Capture Processing Result: Based on the result, the developer should update the UI accordingly. There are two key variables: currentHeadPose and isCompleted. The expected head pose should be displayed on the UI to guide the user in completing the face scan.
Once the face scan is completed, the session is passed to the next screen and it can later be used to generate or verify a SensePrint.
Errors: Similar to Active Face Capture, refer to the steps outlined in Active Face Capture, Step 4
